How to Create a Token on Solana: An SPL Token Launch Guide
Learn how to create an SPL token and launch a Solana token with Tsunammi Tools, from supply and authorities to Jito fees, initial buys and wallet pools.
What token teams need to decide before they mint, launch and manage a Solana asset
Solana’s token infrastructure separates two decisions that launch platforms often blur together. The first is technical: creating a mint, defining its supply and authorities, and attaching recognizable metadata. The second is commercial: launching that asset into a market where people can buy and sell it. A token can exist in a wallet without having liquidity, price discovery or a community of holders. That distinction should shape every launch plan.
This guide explains how to create a token on Solana with Tsunammi’s Create Token tool, what the important SPL settings mean, and how the process changes when the objective is to launch a Solana token through Pump.fun. The screenshots follow the current Tsunammi Tools interface and show the actual fields an operator encounters rather than a generic token-launch diagram.
What it means to create an SPL token
On Solana, a fungible token is identified by its mint account. That account stores the supply, decimal precision and authority configuration that apply across the token’s accounts. The mint address—not the token name or ticker—is the asset’s unique identifier across wallets, applications and explorers. Solana’s official token documentation also distinguishes the mint itself from token accounts, which hold balances for individual owners.
That architecture explains why token creation is more than choosing a name. Two projects can use the same ticker, while their mint addresses remain different. A founder who wants to create an SPL token must therefore decide which wallet controls the mint, whether additional supply can ever be issued, whether token accounts can be frozen and whether metadata should remain editable. Those choices determine what the issuer can do after deployment and what holders have to trust.
Before opening the token creator
A useful token brief can fit on one page, but it should exist before the transaction is signed. Prepare the full token name, a ticker of up to six characters, the total supply, the number of decimals, a square logo, a short public description and the ownership wallet. If the token represents a product or community, prepare the official website and social accounts at the same time so every public surface points to the same mint address.
Supply and decimals are related but not interchangeable. Supply describes how many whole tokens exist; decimals determine how finely each token can be divided. Nine decimals—the value shown by default in the current Tsunammi interface—allows one token to be represented in billionths. Decimal precision does not create economic value and does not change the percentage of supply owned by a holder. It changes the units in which wallets and applications account for balances.
Step 1: Enter the token details
Open Create Token. The main form collects the token name, ticker, decimals, supply, logo, description and ownership wallet. The current interface accepts a token name of up to 32 characters, a ticker of up to six characters, a description of up to 150 characters and PNG or JPEG artwork up to 2 MB, with 200 × 200 pixels recommended for the logo.
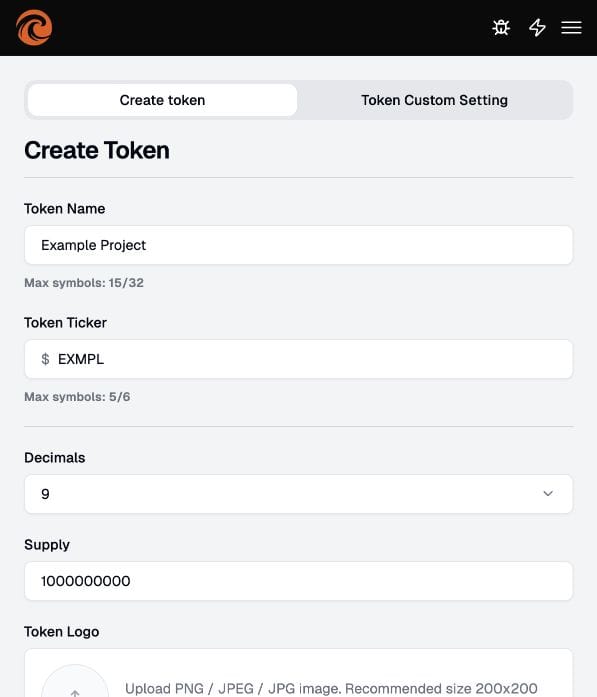
Names should be recognizable without trying to imitate an existing asset. The ticker should be short enough to remain readable in wallets and trading interfaces. The description is not a white paper: it should tell a user what the token represents and where it belongs. The logo should remain legible at small sizes because most users will first encounter it as an icon next to a balance or trading pair.
Choose the ownership wallet deliberately
The ownership wallet is an operational decision, not a cosmetic field. It becomes the address connected to the token’s initial control and should be selected according to the project’s security model. A throwaway browser wallet may be convenient during testing, but a production token needs a wallet policy: who can sign, where recovery material is stored and whether control should later move to a multisignature or another treasury setup.
Do not paste or upload seed phrases, private keys or exchange credentials into a token creator. The platform only needs the public wallet connection and transaction approval. The mint transaction should always be reviewed in the wallet before it is signed.
Step 2: Decide what the issuer should still be able to change
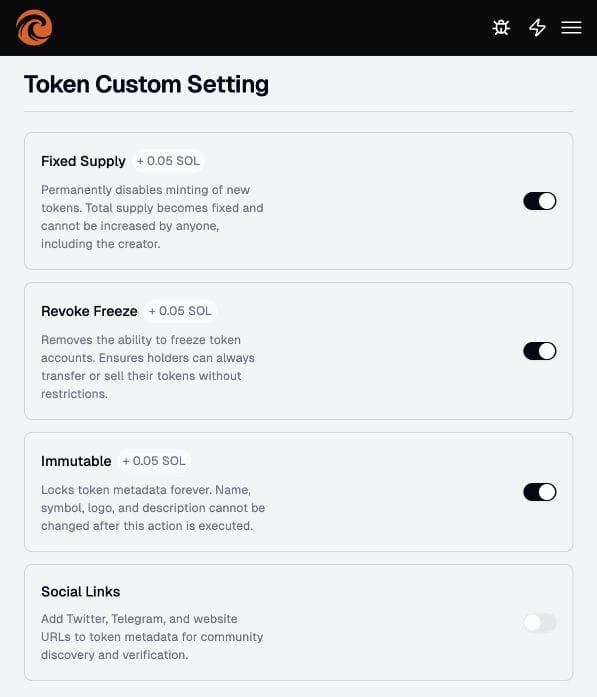
The Token Custom Setting tab exposes four choices: Fixed Supply, Revoke Freeze, Immutable and Social Links. These settings affect different layers of the asset, so they should not be treated as one generic “make token safe” switch.
Fixed Supply
Fixed Supply permanently disables further minting. In Solana’s token model, the mint authority is the address allowed to issue additional units. Removing that authority means the supply cannot later be increased by the creator or anyone else. This can reduce one category of holder risk, but it also removes flexibility for rewards, emissions, treasury programs or future distribution rounds. The decision needs to match the token’s economic design rather than a slogan.
Revoke Freeze
The freeze authority can prevent a token account from transferring, burning or changing delegates until it is thawed. Revoking that authority assures holders that the issuer cannot freeze their accounts through this mechanism. Retaining it may be appropriate for certain controlled or compliance-oriented assets, but it creates a power that needs to be disclosed. Solana documents authority changes as explicit onchain actions, and revocation is not a setting that can simply be undone later.
Immutable metadata
Making metadata immutable locks the name, symbol, logo and description. That provides continuity once the public launch begins, but it also means a typo, broken image or outdated description cannot be repaired through the same authority. Finalize the brand assets and URLs before enabling it. The sensible sequence is verification first, immutability second.
Social Links
Social Links attach the project’s website and community channels to the token metadata. They do not verify the business or guarantee that a token is legitimate, but they give wallets, explorers and users a consistent route back to the project. Use canonical URLs controlled by the team and keep them consistent across the site, documentation and launch announcements.
Step 3: Review the transaction and create the token
After the details and authorities are set, connect the ownership wallet and review the complete configuration. Confirm the spelling, ticker, decimals, supply, logo and authority choices before selecting Create token. The current Tsunammi interface advertises creation from 0.1 SOL, with optional custom settings priced separately in the form. Network and product fees can change, so the amount displayed immediately before signing is the one that matters.
The successful result should include a mint address and an onchain transaction signature. Save both. The mint address is what exchanges, analytics services, wallets and users need to identify the asset correctly. Tsunammi’s Token Activity History provides a dedicated place to review token operations, while a Solana explorer can be used to inspect the mint and transaction independently.
Create Token and Launch Token are different operations
Creating the mint makes the asset exist. It does not automatically create a liquid market. To launch a Solana token, the team also needs a venue or launch mechanism, an initial pricing process, capital for opening transactions and a plan for what happens after outside traders arrive. Treating deployment and launch as separate stages makes the operational risks easier to see.
Tsunammi reflects this distinction in the product. Create Token produces and configures the SPL asset. Launch on PumpFun combines token information with launch-specific fields such as a Jito priority fee, an initial buy and a wallet pool for coordinated execution.
How to launch a Solana token on Pump.fun
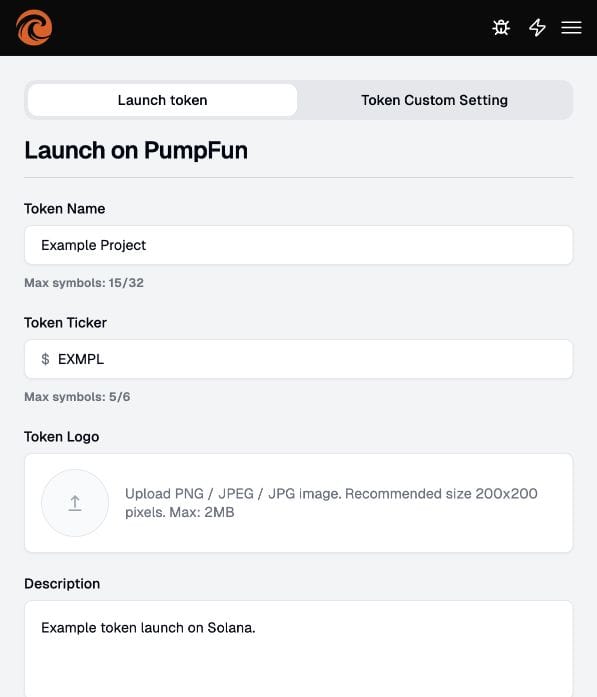
The launch screen begins with familiar metadata—name, ticker, logo and description—but it belongs to a different workflow. The operator is preparing an opening market, not only a mint. Any mismatch between the information used here and the project’s public channels will become visible immediately, so this is the final point to confirm the identity of the asset.
Set the Jito priority fee and ownership wallet
The launch form allows the operator to choose a Jito priority-fee level or enter a custom value. This fee is connected to transaction execution during the launch and is shown as a one-time setting in the interface. A higher fee is not a promise of token performance or protection from every competing transaction; it is an execution parameter. The operator should use the current network conditions and the values displayed by the product instead of hard-coding a fee into an old checklist.
The ownership wallet should be checked again at this stage. The address that controls the asset and the wallets used for market execution have different roles. Mixing treasury custody, launch execution and personal funds in one wallet makes accounting and incident response harder later.
Plan the initial buy
The initial-buy field specifies how much SOL the launch wallet will use at the opening and shows an expected token receipt. This is where token economics becomes market mechanics. The amount affects the creator’s opening inventory and interacts with the launch curve; it should come from an explicit allocation plan, not an arbitrary round number chosen seconds before launch.
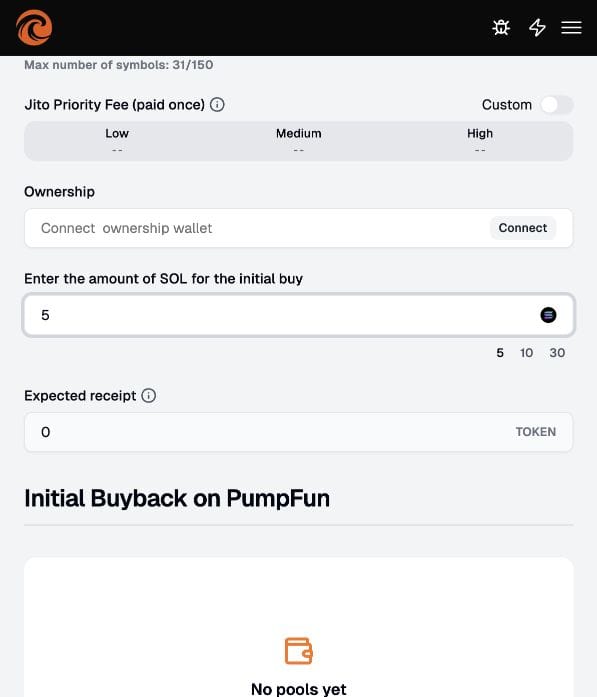
Teams should document who controls the acquired tokens, whether the position belongs to the treasury, and how it may later be used. A large initial allocation can concentrate supply; an allocation that is too small may leave the team without the inventory needed for its stated treasury or market plan. The correct size depends on the launch structure and disclosures, not on a universal percentage.
Select a Wallet Pool for the opening workflow
The Initial Buyback section connects the launch to a Wallet Pool. A pool groups the operational wallets used in the workflow, so the team can prepare addresses before timing becomes critical. If the wallets need to be funded from an exchange account, Tsunammi separates Connect CEX API from Top up wallets from CEX.
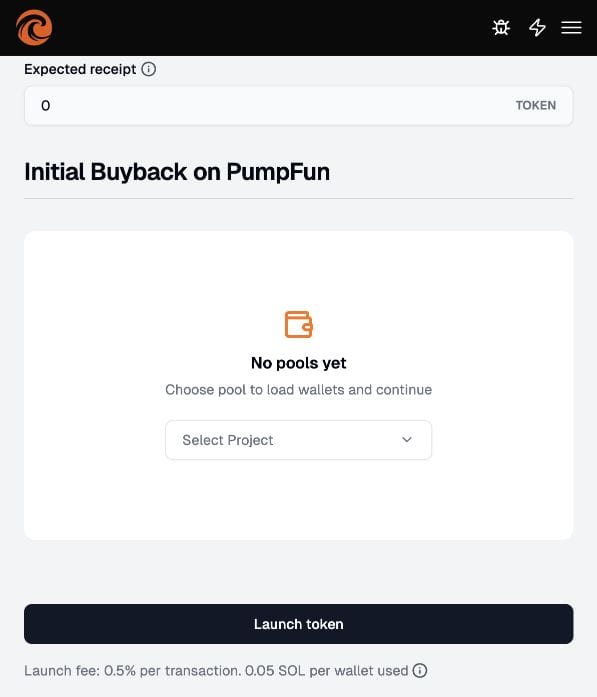
Prepare and fund the wallet pool before the launch window. A launch is a poor moment to discover that an address has insufficient SOL for execution or transaction fees. The final screen currently discloses a 0.5% launch fee per transaction and 0.05 SOL per wallet used; as with every fee, verify the live value in the interface before approval.
What happens after the token launches
A successful transaction is not the same as a successful market. Once trading starts, the team has to monitor liquidity, holder distribution, treasury inventory and execution quality. If the operating plan includes structured post-launch activity, Tsunammi separates buy-side actions in Price Boost, sell-side actions in Price Drop and conditional execution in Smart Buy/Sell. Completed operations can be reviewed in MM History.
Those tools do not replace a token strategy. They provide an execution layer for a team that has already defined budgets, conditions, responsible operators and limits. Market actions should be assessed for legal, venue and disclosure requirements in the jurisdictions where the project operates.
Common mistakes when creating a Solana token
Confusing the ticker with the token’s identity
A ticker is a label; the mint address is the identifier. Publish the correct mint address on the official site and channels, and verify every integration against it.
Choosing supply and decimals without an allocation model
A billion-token supply is not inherently cheaper or more valuable than a million-token supply. What matters is distribution, liquidity, unlocks and the percentage represented by each allocation.
Revoking authorities before checking the metadata
Fixed supply, revoked freeze authority and immutable metadata can be useful trust signals, but they are irreversible controls. A misspelled symbol or broken logo becomes much harder to correct once metadata is locked.
Creating a token without a launch plan
The mint may be complete while no tradable market exists. Decide in advance whether the asset will remain a closed utility token, launch through Pump.fun or use another liquidity route.
Preparing wallets during the launch
Create and fund operational wallets ahead of time. Separate ownership, treasury and execution roles so the team can audit what happened after the opening.
FAQ
How much does it cost to create a token on Solana?
The current Tsunammi Create Token screen advertises a base launch fee from 0.1 SOL. Fixed Supply, Revoke Freeze and Immutable are displayed as optional additions of 0.05 SOL each. Network conditions and product pricing can change, so confirm the total shown in the interface before signing.
Can I create an SPL token without coding?
Yes. Tsunammi Tools provides a form-based flow for the mint, supply, metadata and authority settings. The underlying result is still an onchain Solana token mint.
Does creating a token automatically launch it?
No. Creation produces the token and mint address. A public launch requires a market or launchpad workflow, such as Launch on PumpFun, plus the capital and execution plan for the opening.
Can token supply be changed later?
Only while a valid mint authority remains. Enabling Fixed Supply removes the ability to mint additional tokens. Treat that decision as permanent.
What should I check after launch?
Confirm the mint address and transaction, inspect the authority state, verify metadata, monitor liquidity and holder distribution, reconcile operational wallets and review the execution history. Solana’s verification guide explains how wallets and explorers distinguish a canonical mint from assets using similar names.
The practical takeaway
To create a token on Solana responsibly, make the irreversible choices before the interface asks for them. Define the supply model, choose authority settings, prepare accurate metadata and assign wallet roles. Then decide whether the asset only needs to exist or whether the project is ready to launch it into a live market.
Create Token handles the SPL mint and its core settings. Launch on PumpFun moves the process into opening execution, initial buying and wallet coordination. Keeping those stages separate makes the launch easier to audit—and makes it far less likely that a permanent onchain decision is made as an afterthought.